This documentation is for the Venture theme, which was created before the WordPress Block editor.
That’s why it’s called a ‘hybrid’ theme – it’s based on the classic theme structure but also supports the Block editor.
Before setup
Before proceeding to the set up process, make sure to:
- Download the theme from Themes Harbor
- Install the theme onto a WordPress website
After activating the theme, the website is ready to be set up.
Setup instructions
With help of Venture theme documentation, Themes Harbor strives to simplify the process of setting up a WordPress theme.
That’s why we use the latest WordPress technologies to reduce setup time while providing a high level of flexibility in creating page layouts that meet your needs.
Here is a list of steps needed to replicate the demo website:
- Create Home page
- Create Blog page
- Create Services page
- Create Portfolio page
- Create Testimonials page
- Create Contact page
- Create custom page layout
Note that these layouts are presented as an example, meaning you are free to customize them to meet your needs.
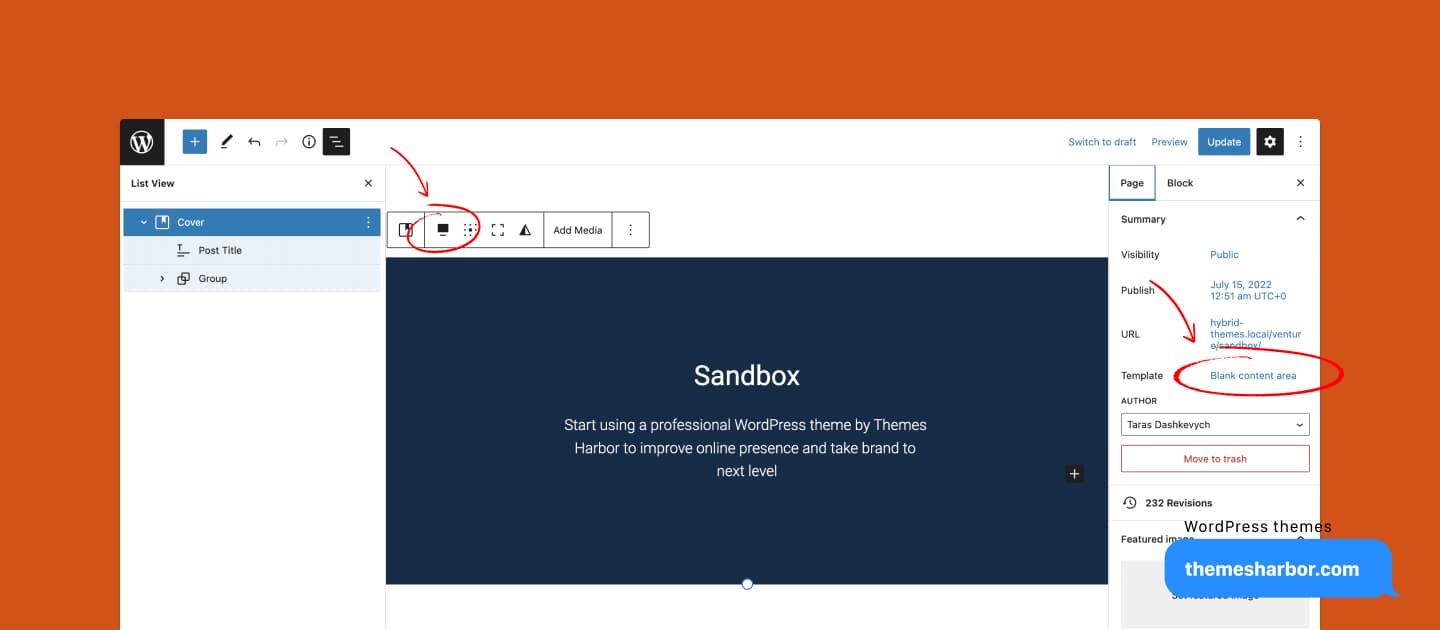
Important:
Those layouts work best when using the Blank content area template, selected within Template pane in Block editor.
Additionally, these layouts change only the content area of the page, while keeping the site header and site footer untouched. To configure header and footer areas, see website configuration instructions at the bottom of this documentation.
Create Home page
To create this page:
- In WordPress dashboard, add new page to a website.
- In the editor, enter a meaningful page title since it’s important for SEO.
- Click the + Block Inserter in the top left corner.
- Click on the Patterns tab.
Then, follow these instructions to select a pre-made layout. Once done editing, make sure to set it as a front page of your website.
Create Blog page
There are two ways to create Blog page for a website when using the theme.
Default Blog page
By default, WordPress automatically generates a Blog page.
Although, it’s still necessary to create a page and assign it as the Posts Page to direct WordPress to use it for blog posts.
Note, WordPress will automatically generate the content for the page, so keep content area empty. But, do not forget to set the page title for SEO purposes.
Custom Blog page
It’s also possible to create a custom layout for the Blog page, instead of relying on the default.
To achieve this:
- In WordPress dashboard, add new page to your website.
- In the editor, enter title for the page.
- Click the + Block Inserter in the top left corner.
- Click on the Patterns tab.
- Within available categories, select Page Layouts.
- Within available layouts, select Blog page layout.
Clicking the layout adds it to the editor’s content area.
Then, use available editor options to customize the layout based on your needs.
Note, avoid assigning the page with custom Blog layout as the Posts Page in WordPress settings. This step is only needed when using a default Blog layout.

Create Services page
To create this page:
- In WordPress dashboard, add new page to your website.
- In the editor, enter title for the page.
- Click the + Block Inserter in the top left corner.
- Click on the Patterns tab.
- Within available categories, select Page Layouts.
- Within available layouts, select Services page layout.
Clicking the layout adds it to the editor’s content area.
Then, use available editor options to customize the layout based on your needs.
Create Portfolio page
To create this page:
- In WordPress dashboard, add new page to your website.
- In the editor, enter title for the page.
- Click the + Block Inserter in the top left corner.
- Click on the Patterns tab.
- Within available categories, select Page Layouts.
- Within available layouts, select Portfolio page layout.
Clicking the layout adds it to the editor’s content area.
Then, use available editor options to customize the layout based on your needs.
Create Testimonials page
To create this page:
- In WordPress dashboard, add new page to your website.
- In the editor, enter title for the page.
- Click the + Block Inserter in the top left corner.
- Click on the Patterns tab.
- Within available categories, select Page Layouts.
- Within available layouts, select Testimonials page layout.
Clicking the layout adds it to the editor’s content area.
Then, use available editor options to customize the layout based on your needs.
Create Contact page
To create this page:
- In WordPress dashboard, add new page to your website.
- In the editor, enter title for the page.
- Click the + Block Inserter in the top left corner.
- Click on the Patterns tab.
- Within available categories, select Page Layouts.
- Within available layouts, select Contact page layout.
Clicking the layout adds it to the editor’s content area.
Then, use available editor options to customize the layout based on your needs.
Create custom page layout
Besides pre-made layouts, it is also possible to create own custom layout using WordPress blocks.
Just like with pre-made layouts, use the Blank content area template to create custom layouts. It can be selected within the Template pane in the Block editor.
Full screen header cover
To have a full screen header cover on a page:
- Add Cover block as the first block of the page content.
- Configure background using the block’s options.
- Add content to Cover block. For instance, to display the page title inside the block, use Post Title block. Make sure to select
H1as a heading level for Post Title block. - Select Cover block.
- In Block Toolbar, change Align option to Full width.
Website configuration
In addition to page layouts, there are some important sections.
Header
The site header area is located at the top of a webpage.
It displays the following sections:
- Branding, with support for logo and title.
- Navigation, with support for search form.
The theme automatically displays the site header area on pages, based on WordPress settings.
Sidebar
The sidebar section displays widgets on a WordPress website.
When the sidebar widget area contains widgets then the sidebar becomes active. Otherwise, it stays inactive.
If the sidebar is active, it will be displayed on the right by default. However, it’s possible to move it to the left.
To change a sidebar position:
- In the Customizer, go to Theme Options → General Options.
- Select desired alignment from Sidebar Position drop-down.
- Click Publish.
Note, not all pages are designed to display the sidebar. Only default templates support the sidebar when it’s active.
So, it the sidebar widget area contains widgets but the sidebar is not shown on the page then it means that the page does not support the sidebar.
Footer
The site footer area is located at the bottom of a webpage.
It displays the following sections:
- Footer widget area, with support for blocks.
- Footer navigation, with support for inline links.
- Social links menu, with support for many networks.
- Footer custom text, with support for custom credits.
To set Footer custom text in theme:
- In the Customizer, go to Theme Options → General Options.
- Add text to textarea below Footer Credits.
- Click Publish.
The theme automatically displays the site footer area on pages, based on WordPress settings.